Friday, July 10, 2015

A Weekend Photo Tour!

Eggplant! Beware the spikes!

It's been a while since my last post, and the garden is going strong. We've had a very wet start to the summer, which has been a challenge at times with the tomatoes. But now that we're having more summer-like temperatures everything is happy and green!

Here is a photo tour of the garden from this afternoon. This week I'll be doing some posts focusing specifically on certain crops, so stay tuned!

Garden facing north


Garden facing south


Melons

I'm looking forward to these melons. As you can see they are easily trained right up the tomato cage. I'll be doing a post on these this week! 

Blue Beauty tomatoes

Easily my favorite tomato, and these plants are already loaded with some nice fruit! 

Orange You Sweet peppers

A delicious orange pepper that is great for stuffing. 

Poblano peppers

Our favorite pepper in the garden. A hint of heat, and tons of flavor. Also among the most prolific pepper varieties I've grown. 

Orange and red chard mix

Chard is one of our favorite greens to eat, so we have several containers planted this year. 

Perpetual Spinach

This is a type of chard, but looks and tastes more like spinach. It also does not bolt in the heat! 

Beets

We just had our first beet harvest! I'll be doing a post about the beets next week as well. 

Daddy Mix petunias

Petunias are my favorite flower in the garden. The Daddy Mix is a variety of 3 veined petunias.

Thursday, June 11, 2015

You Can (and should) Eat Your Broccoli Leaves!

Today's update will be a quick one, but I think you'll also find it useful if you grow broccoli. I recently read an article about a "new" vegetable that Foxy, one of the major produce suppliers in the US, is marketing across the country called BroccoLeaf. It is, as the name suggests, simply broccoli leaves. A quick Google search will turn up dozens of entries about the product. As someone who loves cooking (and eating) I was intrigued. 
our first broccoli harvest of the season!
If you grow broccoli you know that there are a lot of leaves on the plant when it is fully mature, which means that there is a tremendous amount of produce that typically goes to waste (or the compost bin) if you only eat the florets. I wanted to see if the leaves could stand up as a real component of a meal and not just a small scale snack while working in the garden, so when we harvested our first batch of broccoli last night I decided to mix in several large leaves and sauté it all together with some butter and fresh herbs. In a word: incredible! The leaves taste like a milder, slightly less sweet version of the floret/stalk.

leaves, stalk, and florets ready for the saute pan!
You can count me among the many who never thought to eat the broccoli leaves, aside from munching on a few here and there while working in the garden. In retrospect, it's obvious! Being from the same family as kale and collards, it only stands to reason that broccoli leaves (which look a lot like collard leaves) would be not only edible but tasty and packed with nutrients.

If you enjoyed this post, please like Captive Roots on Facebook and help spread the word! Remember that you can also receive alerts when future posts become available by subscribing via email on the right hand side of the screen.

Until next time, happy gardening!

Monday, June 8, 2015

Crop List for the 2015 Garden!


For the 2015 garden I wanted to strike a nice balance between experimentation and utility. Since we found that peppers freeze amazingly well (you can read more about that here) I decided to increase our production of peppers this season. I also wanted to devote a sizeable portion of our container space to cooking greens, as we enjoy fresh greens on a regular basis. I have wanted to try melons for years now, so I found a really neat small heirloom melon that Thomas Jefferson grew at Monticello. It will be about the size of the Sikkim cucumber that I grew last season (you can read more about the Sikkim cucumbers from last season here).
an unusual crop...
So, without further ado, here is the 2015 crop list! Anything in blue is a variety I have never tried to grow before.

Tomatoes

Blue Beauty, 2 plants in one 12 gallon pot, 1 plant in a 5 gallon pot
Golden Sunray, 2 plants in one 12 gallon pot
Roma, 2 plants in one 12 gallon pot
Frosted Green Doctors Cherry, 2 plants in one 7 gallon pot
Black Cherry tomato, 2 plants in one 7 gallon pot

Peppers

Oda Pepper, 2 plants in one 7 gallon pot
Anaheim Chili, 2 plants in one 7 gallon pot
Poblano, 3 plants in one 12 gallon pot, 2 plants in one 5 gallon pot
Orange You Sweet, 2 plants in one 5 gallon pot
Cayenne, 2 plants in one 5 gallon pot
Biggie Chili, 2 plants in one 5 gallon pot
Fort Knox, 2 plants in one 7 gallon pot
Jimmy Nardello, 2 plants in one 5 gallon pot

Eggplant

Long Eggplant, 2 plants in one 7 gallon pot

Cooking Greens

Swiss Chard (mix of red and orange), 4 plants in one 7 gallon pot
Perpetual Spinach Chard, 5 plants in one 7 gallon pot
Vates Collards, 4 plants in on 7 gallon pot
Pink Chard, 4 plants in one 5 gallon pot
Kale, 4 plants in one 7 gallon pot

Cucumbers and Melons

Ananas D'Amerique A Chair Verte Melon, 4 plants in one 12 gallon pot
White Cucumber, 3 plants in one 7 gallon pot
Lemon Cucumber, 3 plants in one 7 gallon pot

Herbs (various containers)

Rosemary
Thyme
Purple and Green Basil
Marjoram
Parsley
Oregano
Catnip
Fenugreek
Chives
Cilantro
Sage

Miscellaneous Edibles (various containers)

Green Onions
Purple and Green Bush Beans
Broccoli
Beets
Meyer Lemon Tree

Flowers

Daddy Mix Petunia
Button Zinnia
Green Envy Zinnia
Dwarf Cosmos
Marigolds

In the coming weeks, I plan on spotlighting each of these crops with in-depth photos and more information about the containers and growing habits of each plant. It should be a great summer in the garden!

If you enjoyed this post, please like Captive Roots on Facebook and help spread the word! Remember that you can also receive alerts when future posts become available by subscribing via email on the right hand side of the screen.

Until next time, happy gardening!

Saturday, June 6, 2015

Plant Peppers and Tomatoes Deep for Higher Yields and Stronger Plants


Plant deep. That is the best piece of advice I could give anyone who wants to grow healthier and more productive peppers and tomatoes. With tomatoes this is common knowledge among gardeners, and you won’t cause much of a stir by doing it. But anyone who has spent any amount of time reading a gardening forum knows that the topic of deep planting peppers can cause quite the debate. Many swear that peppers do not root from their stems, and that you will kill your plants because the stem will rot. This scares people away from trying it because of course they don’t want to risk killing their plants.
Peppers from early last summer... all planted deep and all very much alive!
Gardening is like any pursuit in that those who are passionate about it tend to have strong opinions. Just read a message board thread about organic vs. non-organic gardening for a quick primer on this. All I can speak to is my experience and the experiences of other successful gardeners who I trust. If your experience is anything like mine (and many other people who have practiced this method for decades) your pepper plants absolutely do root from their buried stems and do benefit from deep plantings just like tomatoes do. Eggplants benefit from deep planting as well. And why not? All three are members of the nightshade family, along with potatoes (which also should be buried as they grow for higher yields). It makes sense that they share similar growth habits.
loaded Jimmy Nardello plants from last summer
Deep planting of tomatoes, peppers and eggplants has a few major benefits. One is that more roots=more nutrient intake. The more nutrients a plant can take in, the more energy it has to do all of the stuff we want it to do (grow, branch out, produce fruit). In addition, more roots mean a stronger, sturdier plant in the wind. Each of those roots is an anchor that helps the plant avoid getting thrashed around in the wind. Finally, if you start seedlings indoors chances are that your plants are a bit leggy, which means they are very tall and thin due to the lack of sufficient light. They are literally reaching for the light! If you plant a leggy seedling at the same depth it was in its seed tray you will most likely have a top-heavy plant that could easily snap in a strong wind, which we get plenty of here in Buffalo.
Golden Sunray from 2015 garden.... stocky and already had a small tomato in late May!
So how do I plant deep? I simply remove the leaves from the lower 2/3 of a tomato or pepper plant, dig a hole deep enough to bury the plant about 2/3 of the way, and plant it. Don’t worry about getting it perfect; nature is tough, and gardening should be fun! If you forget to remove a leaf and it gets buried? DOOM! Actually, you won’t notice any difference; the leaf will just decompose in the dirt like the leaves that fall from the plant during the growing season do. Also, don’t sweat too much about exactly how deep you plant the seedling. Whether it is 40%, 50% or 70% buried the stem is going to produce more roots and the plant will be much stronger because of it than it would be otherwise. 

About those deep planted peppers… I have been deep planting all of my peppers for the past couple of years now. Far from sickly plants with rotten stems, the poblano plants last summer were about 5 feet tall, with thick tree-like stems. We are still eating cayenne peppers that we froze from last year’s garden. I grew 2 plants in a 5 gallon container. We just used the last of our aforementioned poblano peppers. I only grew 2 plants in one 7 gallon container. Remember, a plant is only as good as its roots, which is why a rich and well draining growing medium is essential for getting the results you want. Healthy roots=healthy plants. Having a lot more of those healthy roots makes a tremendous difference in the health and yield of your plants.

healthy plants=bigger yields... this is a 7 gallon container in 2013
I mentioned eggplants before. I often plant eggplants an inch or two deeper than the seedling trays, mostly because they tend to be stockier and tougher as seedlings and don’t really have a long stem to begin with. I typically plant them up to the base of the lowest leaves (without removing any). Sometimes though you will encounter a leggy eggplant seedling, and if that’s the case you can (and should) plant it just like a tomato or pepper.
more happy peppers from last summer's garden
Summer is well underway here in Western New York, and the garden is starting to really take shape! I look forward to sharing my adventures in container gardening with all of you for the next few months, and I hope your gardens are starting to bloom as well!

If you enjoyed this post, please like Captive Roots on Facebook and help spread the word! Remember that you can also receive alerts when future posts become available by subscribing via email on the right hand side of the screen.

Until next time, happy gardening!

Thursday, June 4, 2015

First Update of the 2015 Season!


It’s been a hectic month or so, which is why I’ve been away from Captive Roots for a bit, but now that the garden is up and running look for a lot of updates in the coming months!

broccoli!
May was an adventure. We had two nights that dipped into the mid to low 30’s, which meant protecting plants from possible frost. There are two main ways to do this: cover them or bring them inside. One advantage of container gardening is that you can simply bring plants into a garage, living room, or other protected space overnight. Of course, you could always simply cover crops with bed sheets, empty pots, cardboard boxes, or plastic sheeting if moving them is not possible or feasible. The key thing is to keep the frost from touch the leaves. They will still be cold (plants aren’t warm blooded!) but it’s the surface freezing that ruptures their cells walls and destroys plant tissue. To be safe, we just brought our entire garden inside for the evening both times.


a plant slumber party!

Luckily, after a bout of cold nights it warmed right up, and things have been taking off in the garden! The peppers and tomatoes are really rolling, and the Golden Sunray tomato plant already has a couple of small tomatoes! We have already harvested collard greens and a bunch of herbs, and the kale is ready for its first harvest as is the orange and red Swiss chard. Here are some photos from the garden taken the last week of May.

Vates collards

daddy mix petunia
 
orange and red chard
In the coming months I will be updating the blog a few times a week. Sometimes it will be a quick photo update, sometimes a more involved post. This weekend will feature a list of garden crops for the 2015 garden and a quick post about why planting tomatoes and peppers deep is always the best strategy.

If you enjoyed this post, please like Captive Roots on Facebook and help spread the word! Remember that you can also receive alerts when future posts become available by subscribing via email on the right hand side of the screen.

Until next time, happy gardening


Wednesday, April 8, 2015

A Photo Update of the Seedling Table

Petunia
Peppers
Close-up of an Poblano pepper
Collards!
Blue Beauty tomato close-up
Tomatoes!
Fenugreek
Purple Basil

Friday, April 3, 2015

Freezing Peppers and Tomatoes


It’s been a bit slow on the garden front lately, but it finally seems like our perpetual winter is coming to an end here in Western New York, so things will be picking up soon! I have a photo update prepared for this weekend of all the seedlings and small plants that are just waiting for warm enough weather to go outside, so be sure to check back in the next couple of days. 
Cayenne peppers after 7 months in the freezer
For today’s post I thought I would focus on my favorite method of preserving garden peppers and tomatoes: freezing. Freezing has some advantages over canning. First, it is extremely easy. Second, there are no worries about the acidity of the vegetables when they enter the freezer, whereas in canning you need to drop the acidity to a certain level in order to create an environment that is hostile to botulism. Third, your vegetables can go in raw, and in the case of peppers can remain pretty close to their original state when they come out months later for use.

DIY vacuum seal... Of course a vacuum sealer is even better (and easier)!
Let’s begin with peppers. First, wash your peppers and allow them to dry completely. This is important, because if they go into the freezer wet they will freeze together and make removal of just 1 difficult. Then, simply place the whole peppers in freezer bags, label with the name and date, and seal. Finally, open just enough of the bag to insert a straw and suck out the air through the straw to create a vacuum. The bag should collapse tightly onto the peppers. At this point they are ready to freeze.

You can certainly cut them up first to save space, but I prefer freezing them whole. The tough pepper skins are almost like a plastic bag and provide yet another layer of airtight protection that keeps freezer burn away. I followed this same procedure with some diced peppers and in a couple of months the bag was filled with ice crystals.
Poblano and Jimmy Nardello peppers defrosted and de-seeded
How long will they keep? Well, as of April 3rd we are still using peppers from last year’s garden that were harvested in September. I haven’t seen any noticeable loss of quality or spiciness (most of the peppers we have left are cayenne and poblano). As you can see in the photo above from a few weeks ago the peppers are still bright and firm. There is no reason to worry about freezing taking away the heat from chili peppers—our cayenne peppers are still extremely hot 7 months after freezing.

Poblano and Jimmy Nardello peppers just taken out of freezer (you can see them defrosting)
One final tip for peppers would be to cut them when they are still slightly frozen, as they will be more firm and easier to cut. Remember that freezing ruptures cell walls, so once the item defrosts it will be softer than it was originally. Since we use peppers primarily for cooking this is never evident in the final product.

You can do something similar for tomatoes. We simply blanched and skinned the tomatoes as you would normally. Then, we portioned the whole tomatoes and juice (don’t throw away the juice!) into airtight plastic containers of various sizes and set them in the freezer to make what essentially were giant tomato ice cubes. You can de-seed them as well, but I just put the tomato sauce in the blender if I want it smooth. Finally, we transferred these blocks of frozen tomato into freezer bags and sealed as described above. You can make the blocks any size you want; we tried to make them “meal sized” so that each block would be equivalent to a large can of whole tomatoes. I can’t say how long these would last, as we only had 5 dinners worth of frozen tomatoes and they were gone in January, but they were still fresh tasting and bright then!
 
Frozen tomato block after removal from freezer bag. Use any tomatoes you have: these are Blue Beauty, Roma, and Rutgers all mixed together
Of course freezing has its drawbacks too—namely the freezer space required for storing all these frozen veggies. You are also dependent on your power not going out for extended periods of time. However, if you have a chest freezer (or just a lot of freezer space) and don’t experience long power outages these drawbacks are easily overcome. The process becomes even easier and more effective with the purchase of a vacuum sealer.

Defrosted tomatoes... put them in the blender if you don't like whole seeds in your sauces
 Using these methods you can enjoy your garden’s bounty throughout the cold winter months. Almost anything can be frozen with good results, so this isn’t limited to tomatoes and peppers. We haven’t bought a pepper since our plants began producing last summer, and it looks like we will have plenty to last us until this year’s crop comes in. If you’re looking for an easy way to preserve your peppers and tomatoes, give this a try next harvest season.

I would like to take this opportunity to thank everyone who has read and shared our posts, and otherwise supported Captive Roots over the past few years. We are nearing 27,000 visits, which I never envisioned when I started this blog a couple of years ago. It's now easier than ever to keep up to date with new posts. You can subscribe to Captive Roots via email (just enter your email in the box in the upper right hand corner on the screen). Also, you can follow us on Facebook by clicking here: Captive Roots on Facebook


Until next time, happy gardening!

Thursday, February 19, 2015

Faster Pepper and Eggplant Seed Germination


One issue that many gardeners face is that pepper and eggplant seeds can take forever to germinate. I’ve had some eggplants that took about 2 years to germinate—at least it felt like it! Luckily, there is an easy way to speed up the process without buying anything extra. It's known in the gardening world as the "paper towel method" (or some variant of that) and I can say that it works quite well for peppers and eggplants.

These poblano peppers were in the seed packet 9 days ago!
I will preface this by saying that I would always suggest starting your seeds much earlier in the traditional fashion if possible. For example, my goal for next year is to get the peppers and eggplants started on January 1st. But that’s next year. This year I was trying to decide on which peppers to grow, and by the time I had everything ready it was mid-February. Given that it typically takes weeks for peppers to emerge on my grow table—and even longer for the eggplant—I needed to play catch-up if we wanted to be eating peppers in late June/early July (and we do!).

Supply list: labelled ziploc bag, mister, paper towel, seeds
Here’s what you will need: a Ziploc bag, a paper towel, a mister, and seeds. Begin by wetting the paper towel. No need to soak it, just get it damp. Next, sprinkle the seeds onto the wet paper towel. You'll be folding it over, so just use one side.

Sprinkle seeds on one side of the paper towel
Then, fold the paper towel over. To make it easier, fold it unevenly so that when it is wet you can more easily peel it apart. Otherwise, it will seal and be extremely difficult to separate without tearing.

An uneven fold makes it easier to unfold later
Finally, carefully place the paper towel in the bag and seal ¾ of the way. I know some people seal it all the way, but this is how I do it, and it has worked for me. Last but not least, find a warm spot to place your bag. I put mine on top of our DVR box, which is the perfect temperature. Anywhere that stays warm to the touch will work. If you have a cable/DVR box, that is the perfect temperature, so even if you don’t want to use that space you’ll have an idea of the temperature to shoot for. 

Ready to go!
So, how about some results? I used this method with 6 types of peppers this year: Oda, Fort Knox, Jimmy Nardello, Poblano, Anaheim, and Cayenne. The seeds were put into their bags on 2/10/15. This is what they looked like on 2/15/15.

A poblano sprout... 5 days in the bag
Here are some photos from tonight, a mere 9 days into the process. The Poblano seeds are by far the most advanced, although the Fort Knox are right behind and most of the other peppers are at least popping above the soil.
We have poblanos!
Speaking of eggplants, I used this technique on some eggplant seeds Sunday night. Below is a picture of them taken just 3 days later! Rather than wait, I decided to get them in the soil tonight. This leads me to another tip: don’t wait too long to plant the seeds. You might get longer roots, but the downside is that the longer the root the more fragile the sprout becomes, and therefore the more difficult to transplant without damaging it. To plant, simply unfold the paper towel to reveal the sprouts.Then, gently remove the seeds from the paper towel and place on the surface of your seed starting mix.

Emperor's Best eggplant seeds after only 3 days in the bag!
Finally, just barely cover the root sprouts with soil. If a tiny bit of the top of the seed is visible that is perfect. Don’t bury them too deep! Also, don’t worry too much about getting them perfectly oriented. It’s best to place them sprout (root) down, but get it as close as you can and the seed will orient itself quickly.

Do your best to place the seed sprout (root) side down, but these were placed sideways and they found the light just fine in only a few days!
Keep in mind that temperature will influence the speed at which your seedlings emerge and grow. The warmer it is the faster the seeds will germinate and the faster your seedlings will develop into plants. Our grow table is in a room that does not have its own heat run. During the day we set our heat at 67. At night, we drop it to 60, so the grow room can get a few degrees cooler than that. During the day the heat put off by the grow lights is easily captured and held by the plastic greenhouse tops (worth every penny in my book) but at night the temperatures drop, and short of putting a space heater in the room there isn’t much I can do. This means that when it is frigid outside (as it has been here in Western New York) the plants get a bit of a chill in the evening, which can slow them down some. On the plus side, they are more cold hardy when they go outside in early May.

Cheap and worth every penny!
On the subject of those plastic seeding domes, this is the first time I’ve tried them and so far I couldn’t be happier. In the past I used peat pots for all my seedlings, but I found them to be difficult to deal with because if they dried out they would suck all of the moisture out of the seedlings and it was difficult to re-moisten them without soaking them in water. As a result, they were seemingly always too wet or too dry. This year I switched to the black plastic nursery trays you see in every nursery or garden department. I also decided to try the greenhouse lids to keep the seedlings warmer, and they work wonders! By simply placing one of my grow lamps (which is a 2 bulb 54W T5HO aquarium grow light fixture) about 5 inches from the top of the lid I was able to raise the temperature inside from 67 degrees (the air temperature in that room) to 76 degrees, which makes the peppers very happy. Of course at night it does drop, but much more slowly than if it were open to the air, so that by the time it drops down to 60-62 degrees it is almost time for the lights to come back on for the day.
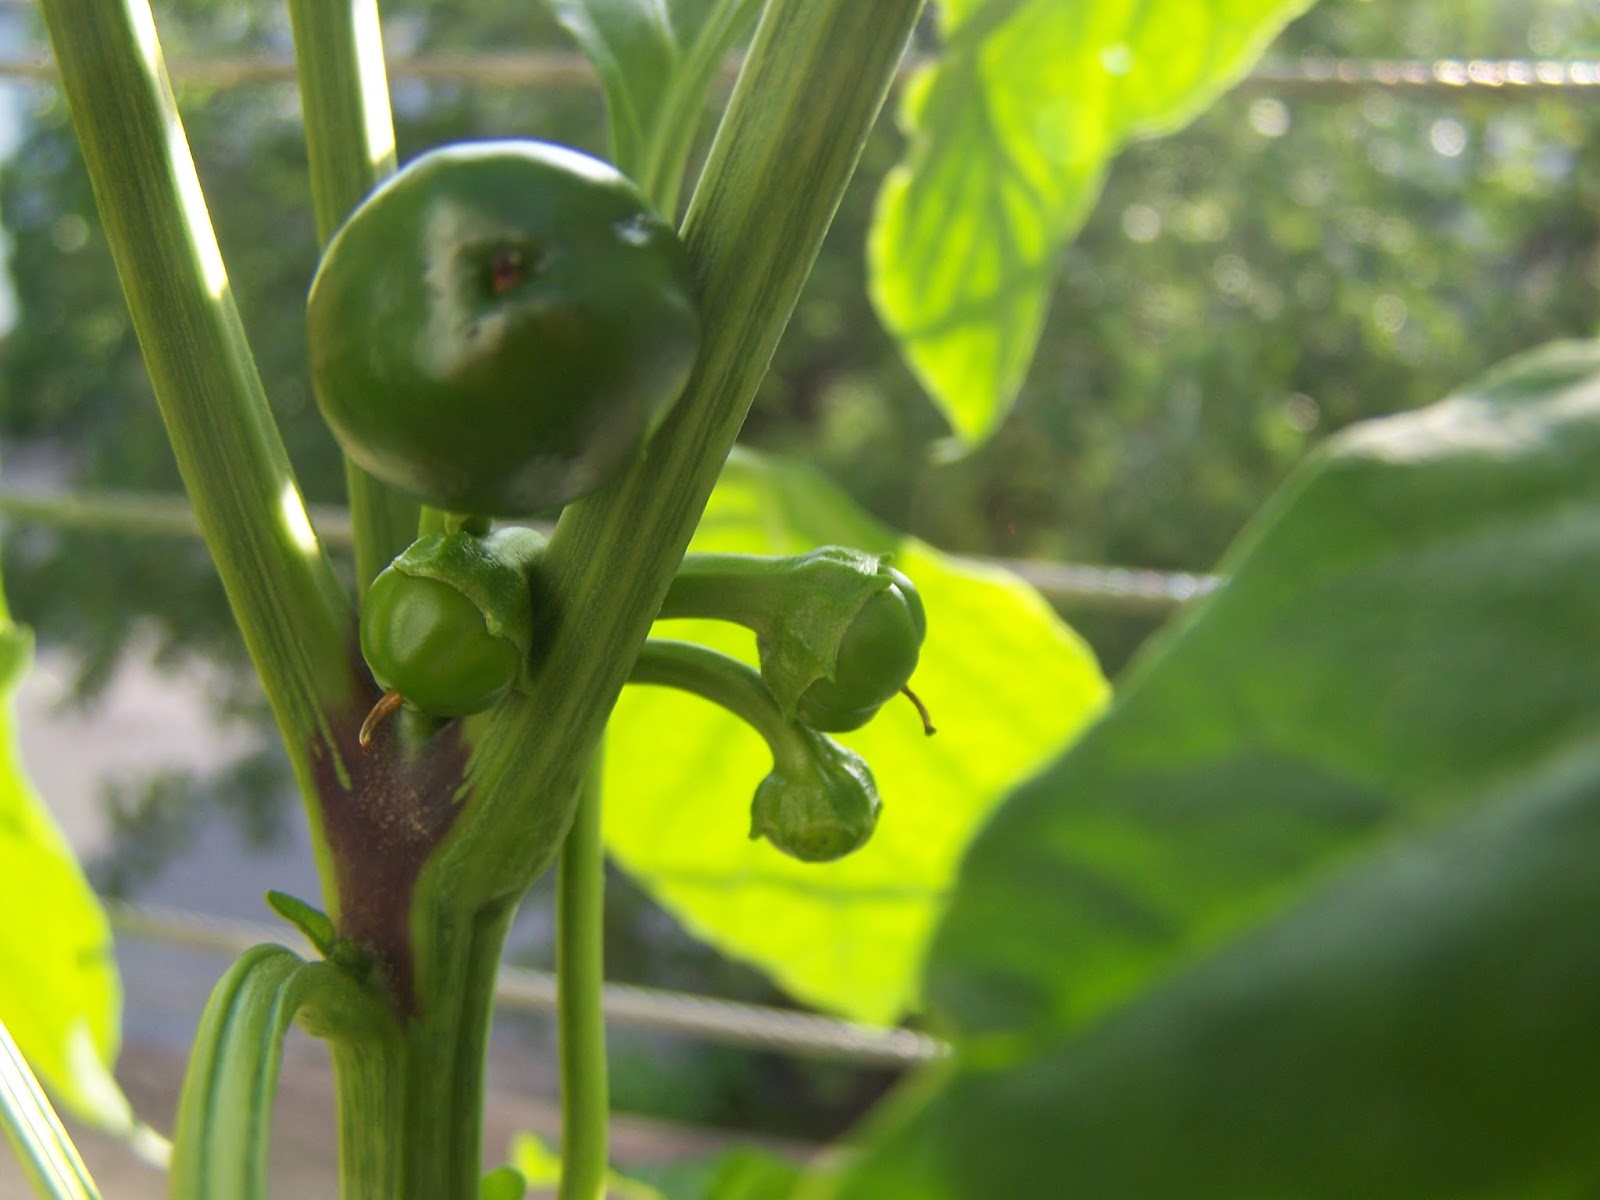
A Fort Knox pepper!

So if you are running behind on starting your peppers and your seeding space is on the cooler side, this is a great method to get your seeds to germinate more quickly. Another plus is that you only plant seeds that have sprouted, so you know every planted seed is viable and you don’t end up with wasted cells. This method will work for just about any seed, but it isn’t really necessary or beneficial for tomatoes, herbs, and other vegetables or flowers, as they all seem to germinate quickly even at slightly lower than optimal temperatures.

If you found this post useful, please like us on Facebook or click the "Join this Site" button in the right panel to receive future updates from the container garden! My hope is to keep the blog updated with 1-2 posts per week, so check back often, and if you have any questions/comments please submit them below or on the Facebook page.

Until next time, happy gardening!